Quick Start
Installation & Dependencies
First, you’ll need:
Make sure Blender and ffmpeg are on your PATH.
Then you can install the latest stable release via pip:
$ pip install visionsim
$ visionsim post-install
Generating a dataset
To give you a taste of how visionsim works, we will create a small scale dataset of a toy lego truck as if it was captured by a realistic 25fps conventional RGB camera and a 4kHz single photon camera for 4 seconds. To achieve this, we will:
Render a small dataset of 500 ground truth frames using the
blender.render-animationCLI,Interpolate this dataset 32-fold using the
interpolate.framesCLI,And emulate different cameras using the
emulate.rgb/spad/eventCLIs.
Rendering Ground Truth
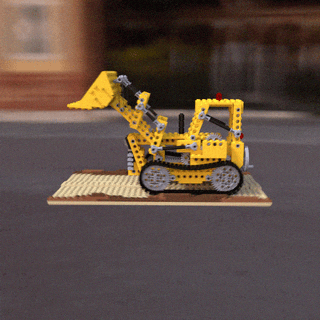
First, download the test scene, here we will be using the lego truck (of the NeRF fame) which you can download from here. This blender file has been modified to include an HDR skybox and a camera animation. Specifically, the camera moves along a circular obit at Z=1 with radius=5 that points towards the origin and lasts 100 frames. Here, we assume your blender file is per-animated, but you can control camera movements and keyframes manually too.
To create the lego dataset, we’ll slow down the camera movement by a factor of 5x and render 500 RGB frames:
visionsim blender.render-animation lego.blend quickstart/lego-gt/ --render-config.keyframe-multiplier=5.0
Note
The blender.render-animation CLI has a lot of options which enable changing render settings and resolution, parallelization, and for generating different types of ground truth annotations such as depth and segmentation maps. You can see all options by running the following:
$ visionsim blender.render-animation --help
If the above command does not work, you might have to change some settings, notably the device-type. For instance on older GPUs that do not support Optix you can do --render-config.device-type=cuda to use CUDA.
Finer grain control can be had using the BlenderClient API.
Warning
This might take a while, with blender 4.2 on a RTX 3080 it takes about 18 minutes.
All the rendered frames will be in quickstart/lego-gt/frames, and alongside this directory you should see a transforms.json file which contains metadata and information about the camera trajectory used for rendering.
Let’s create a quick preview of this dataset by animating every 5th frame into a video, this allows for realtime play back without creating a video with a very fast framerate:
visionsim ffmpeg.animate --input-dir=quickstart/lego-gt/ --outfile=quickstart/preview.mp4 --step=5 --fps=25 --force
The file preview.mp4 should show a nice turntable-style animation of a lego truck (shown here as a GIF made with gifski, yours should look better):
Interpolating Frames
You can optionally interpolate an existing dataset in order to get intermediate frames that have not been rendered. This enables us to quickly increase the effective framerate of the data at the cost of potentially introducing artifacts if frames are too “far” apart. The following will interpolate a dataset by a factor of 32x:
visionsim interpolate.dataset --input-dir=quickstart/lego-gt/ --output-dir=quickstart/lego-interp/ --n=32
This is much faster than rendering new frames, but can still be a bit slow. The above takes about 10 minutes on an RTX 3080.
You can preview this new dataset like above, just use a step of 160 (=5x32) to ensure playback is at the same speed.
Note
The new dataset actually contains 15,969 frames and not 16,000 which might be a little surprising at first as one might expect 32x500=16,000 frames. But consider the case where you interpolate two frames by a factor of 2x. You’ll create a new frame between every existing frame pairs, which will give you 3 frames total, the first original frame, the interpolated frame, and the second original frame. In general, for M original frames interpolated N-times you’ll get NM-N+1 frames after interpolation.
Warning
Interpolation can introduce artifacts adjacent frames in the original dataset are too different from one another. This effect and it’s implications are further discussed in the Interpolation section. In general, interpolation is useful for higher frame rates, it can help bridge the gap between 1,000fps to 10,000fps, not from 10fps to 100fps.
Emulating Sensor Data
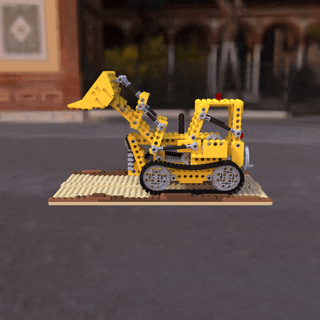
To simulate a real camera, we must convert these “perfect” RGB frames into realistic motion blurred frames with read noise and quantization artifacts.
We use emulate.rgb to create the RGB data with motion blur. The chunk-size argument determines how many frames to average together. Below we are averaging frames from the interpolated dataset in groups of 160, so since the interpolated dataset corresponds to a frame rate of 4,000fps, this means these frames will simulate a 25fps RGB camera:
visionsim emulate.rgb --input-dir=quickstart/lego-interp/ --output-dir=quickstart/lego-rgb25fps/ --chunk-size=160 --readout-std=0
Next, we can emulate a single-photon camera using emulate.spad, at the same framerate as the interpolated dataset like so:
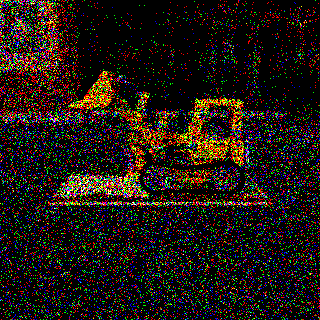
visionsim emulate.spad --input-dir=quickstart/lego-interp/ --output-dir=quickstart/lego-spc4kHz/
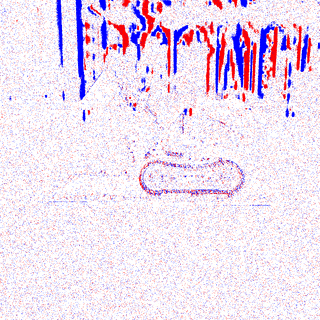
Finally, let’s emulate an event camera using emulate.events, which responds to local changes in scene intensity:
visionsim emulate.events --input-dir=quickstart/lego-gt/ --output-dir=quickstart/lego-dvs125fps/ --fps=125
Let’s look at the results: